- Home
- Chimney Guide
- Chimney Crown Replacement
Chimney Crown Replacement
This post may contain affiliate links so I earn a commission.
Chimney crown replacement may be necessary if your chimney crown, also known as the top plate or a chimney cap, is cracked or damaged.
The crown plays a vital role in the protection of your chimney by sealing off the top portion of your chimney and shedding water away from the masonry construction.
Why do a lot of chimney crowns fail over time? Many crowns are poorly constructed right from the start.
Crowns built out of thin mortar without proper reinforcement will eventually crack over time due to temperature changes and weather conditions.
As the chimney crown deteriorates it causes two things.
First, it allows moisture to run down into the masonry structure of the chimney causing spalling on the exterior bricks.

This moisture also causes the bricks to separate and eventually fall apart.
Second, water can run between the crown and the chimney flue causing damage to the clay tile or even worse, causing damage to the chimney damper, smoke chamber, or the fireplace itself.
Building The Perfect Chimney Crown
Proper chimney crown replacement requires a few important steps which will substantially increase the life of the crown.
Here are a few details to consider:
Do not make the crown flush with the outside chimney wall.
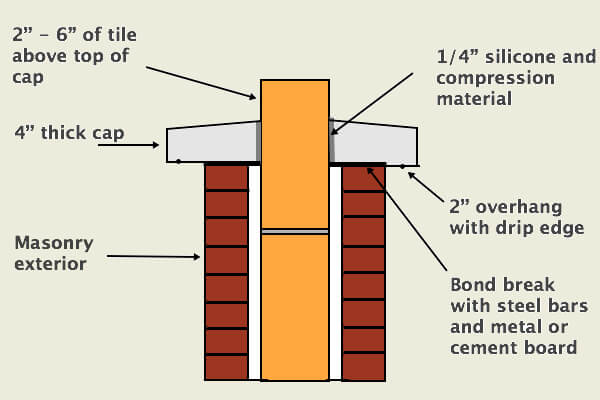
The crown should extend at least 2'' past the outside wall and contain a drip edge underneath.
Use concrete for construction not mortar. Concrete is stronger and can withstand temperature fluctuations and weather exposure better than mortar.
For extra strength, 1''x 1'' wire mesh should be placed in the concrete during the pour. Lay the wire mesh half way through the pour so it's in the middle of the concrete.
Cut the mesh slightly smaller than the crown so it's not exposed to moisture which will lead to rust, possibly causing the crown to crack.
The crown should be at least 4'' thick and have a slight outward slope to shed water away from the chimney flue.
The concrete crown should not come into contact with the flue.
During construction the flue should be wrapped with a compression material to allow a 1/4'' separation between the concrete crown and the flue tile.
Silicone sealant should be added to the 1/4'' separation to prevent water damage.
Ceramic wool insulation makes a great compression material.
Since the concrete and the flue will expand and contract at different rates, this expansion gap will prevent damage to both the flue tile and the crown.
Form a bond break.
Use steel support bars to form a grid pattern from one side of the masonry wall to the other.
Then lay sheet metal or cement board across the metal supports to form a thin bond break between the chimney crown and the masonry walls.
This serves two purposes. First, without the barrier the cement will just run down the chimney structure filling the airspace between the flue and the masonry walls.
Second, it allows the masonry walls and the concrete crown to expand and contract at different rates, reducing the possibly of them cracking.
When building the bond break don't use plywood or other similar materials.
Wood is not only flammable, but it will soak up moisture which will expand when it freezes causing the crown to crack.
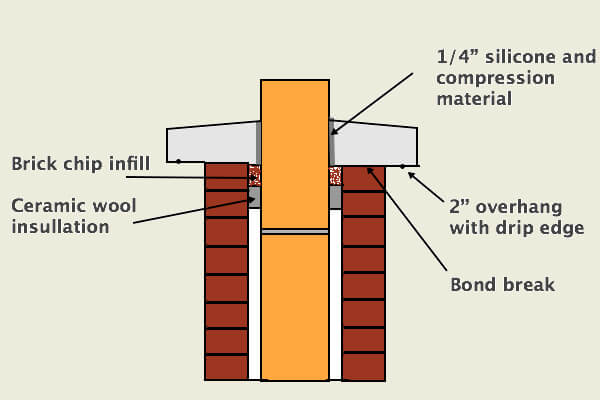
Instead of steel support bars and sheet metal, some contractors choose to use ceramic wool insulation to fill the void between the masonry walls and the flue.
Then brick chip is added on top of the insulation and felt is laid for the bond break.
The top of the flue liner should extend at least 2'' past the top of the crown but no further than 6''.
Check your local building codes to see what's recommended in your area.
Chimney Crown Replacement - Forms
Since you'll be pouring concrete to construct the crown you'll either have to build your own form out of wood or purchase one.
Building a form is often time consuming and dependent on your carpentry skills.
To make things easier you can purchase adjustable steel forms or foam forms that can be cut or adjusted to fit your chimney.
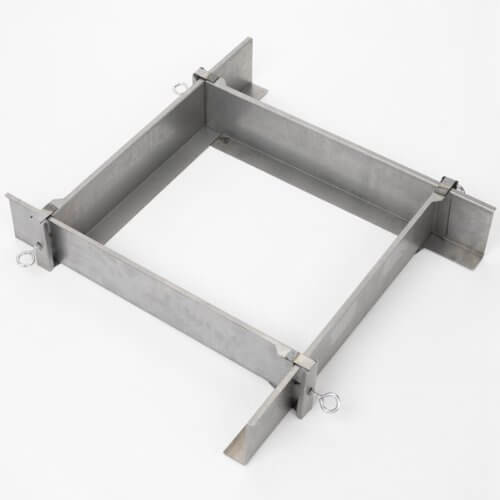
Steel forms are the fastest and most user friendly type of form.
Since they're adjustable you can quickly and easily size them to fit a variety of chimney shapes.
Plus, they're reusable and should last many years if properly cared for.
The downfall of using steel forms is the cost.
Many forms are sold in pairs meaning you'll need to purchase 2 pairs to create a 4 sided form.
A good release agent should be applied to the form to prevent the form from sticking to the concrete.
Many homeowners will only use the form once so the cost of a steel form may not outweigh the convenience they offer.
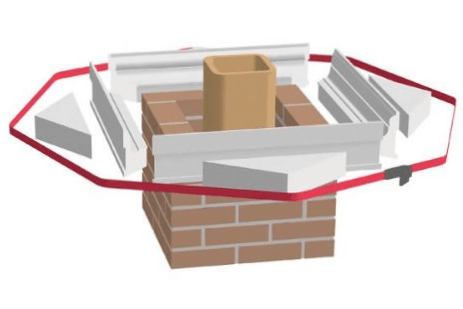
Although they require a little more setup, foam forms are much cheeper than steel forms.
Plus, they usually have a built in drip edge and aesthetic shape.
Foam forms offer convenience without spending a lot of money.
To use one, the foam must be cut and shaped to the dimensions of your chimney.
The foam forms can also be reused multiple times if needed. No matter which style of form you use, thoroughly clean the form after each use.
Overall - Chimney Crown Replacement
If done properly, chimney crown replacement is a project that most homeowners can complete on their own saving you hundreds of dollars in labor.
Plus, your new chimney crown replacement will effectively shed water and protect your chimney and fireplace from serious damage for many years.

About the Author
Obsessed with firewood, Nick is behind over 350+ of Firewood For Life's articles, as well as countless reviews, guides and YouTube videos to help readers like you reduce heating costs and create the perfect fire.
